Mar
21
Written by:
Michael Washington
3/21/2011 5:56 PM

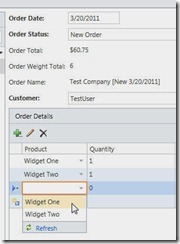
An End-To-End LightSwitch Example
In this article we will create an end-to-end application in LightSwitch. The purpose is to demonstrate how LightSwitch allows you to create professional business applications that would take a single developer weeks to create. With LightSwitch you can create such applications in under an hour.
You can download LightSwitch at http://www.microsoft.com/visualstudio/en-us/lightswitch.
The Scenario
In this example, we will be tasked with producing an application that meets the following requirements for a order tracking system:
- Products
- Allow Products to be created
- Allow Products to have weight
- Allow Products to have a price
- Companies
- Allow Companies to be created
- Allow Companies to log in and see their orders
- Orders
- Allow administrators to see all Companies and to place an order for any Company
- Allow Companies who log in, to see and place orders only for themselves
- Business Rules
- No single order can be over 10 pounds
- No single order can be over $100
- A Order status must be one of the valid order types
Creating The Application

Open Visual Studio and select File, then New Project.
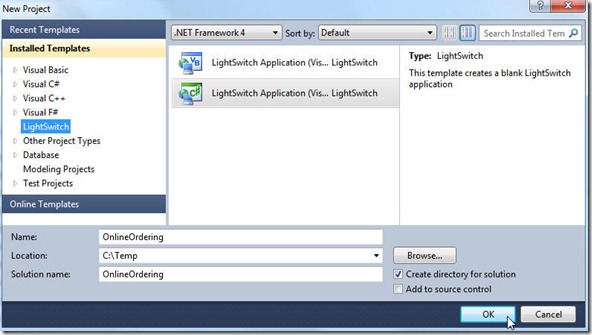
Select LightSwitch, and then the programming language of your choice. This tutorial will use C#.

Select Create new table.
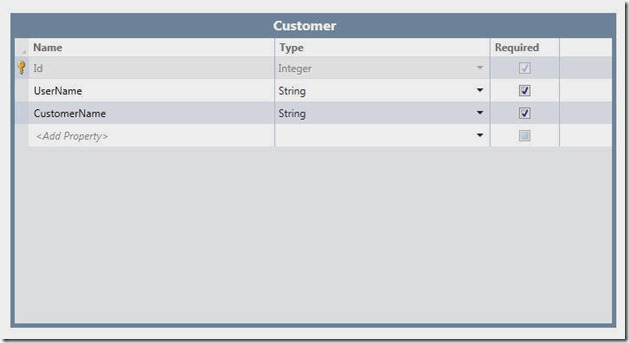
Click on the table name to change it to Customer. Enter the fields for the table according to the image above.
(Note: we will also refer to the Tables as Entities, because when you are writing custom programming it is best to think of them as Entities)
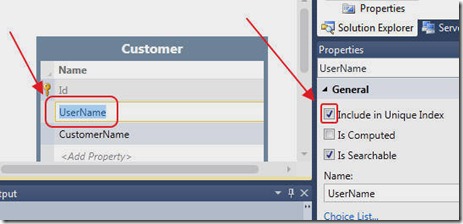
Click on the UserName field, and in the Properties, check Include in Unique Index. This will prevent a duplicate UserName from being entered.
LightSwitch does not allow you to create primary keys for Entities created inside LightSwitch (you can have primary keys for external tables you connect to). Where you would normally create a primary key, use the Include in Unique Index.
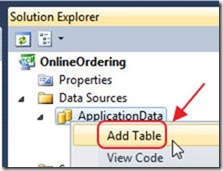
Right-click on the ApplicationData node to add a new Table (Entity).
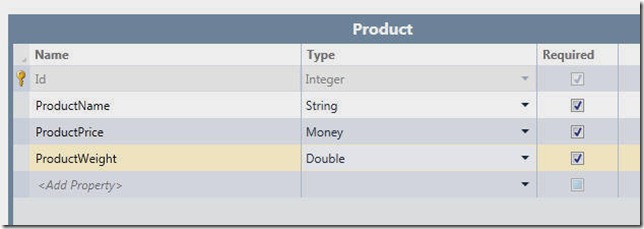
Add a Product Entity according to the image above.
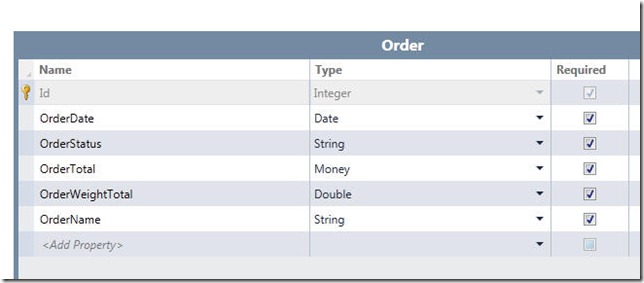
Add a Order Entity according to the image above.

Add a OrderDetail Entity according to the image above.
Creating A Choice List

Open the Order Entity and select the OrderStatus field. In Properties, select Choice List.
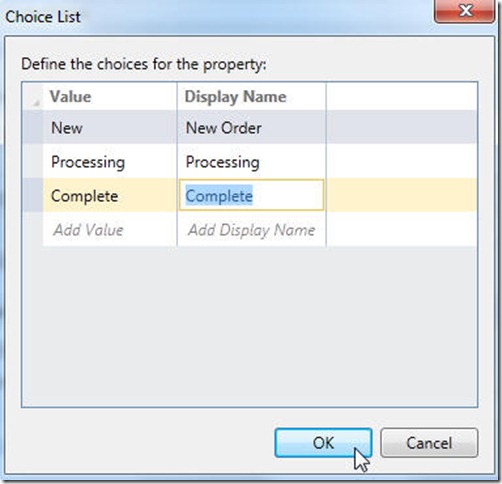
Enter the choices according to the image above.
This will cause screens (created later), to automatically provide a drop down with these choices.
Connect (Associate) the Entities (Tables) Together
It is important that you create associations with all the Entities in your LightSwitch project. In a normal application, this would be the process of creating foreign keys (and that is what LightSwitch does in the background). Foreign keys are usually optional because most applications will continue to work without them. With LightSwitch you really must create the associations for things to work properly.
It will be very rare for a Entity to not have one or more associations with other Entities.

Open the Order Entity and click the Relationship button.
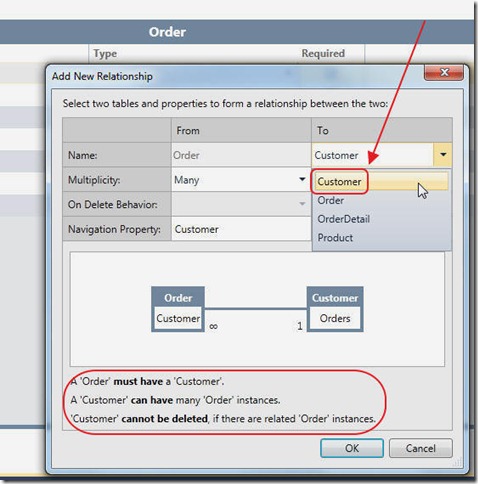
Associate it with the Customer Entity according to the image above.
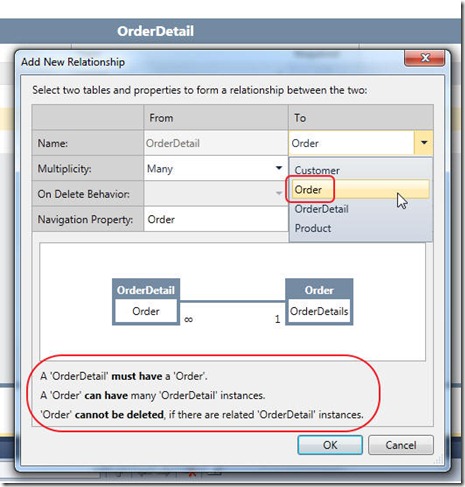
Repeat the process to associate the OrderDetail Entity to the Order entity according to the image above.
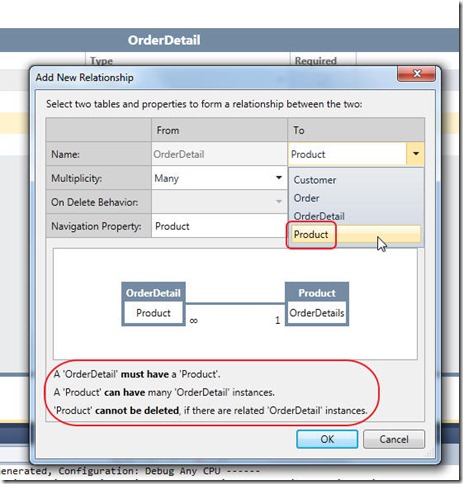
Repeat the process to associate the OrderDetail Entity to the Product entity according to the image above.
Create Computed Columns
A computed column, is a column that shows data that isn't actually stored in a table. This is why I like to reefer to them as Entities rather than tables. If you look in SQL server the table will not have the field, but when you write code against the Entity, the field is there.
The reason you have a computed field, is that LightSwitch will automatically display the data on screens without you needing to write far more complicated code. For example, we want the total of an Order to be displayed. We could leave this calculation until later when we create the Screens, or we can simply make a computed field now.
Later, we simply tell Lightswitch to display the Order Entity. The total for the Order will automatically be displayed.

Click on the OrderTotal field, and check Is Computed in Properties.
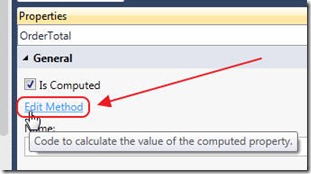
Click Edit Method.
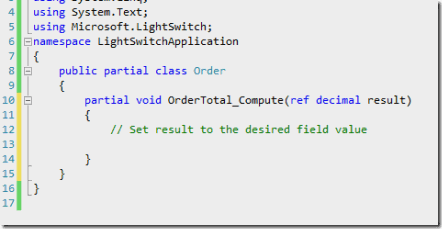
A method will display.
Change the method to the following:
        partial void OrderTotal_Compute(ref decimal result)
        {
            decimal dOrderTotal = 0.0M;
            // Get OrderDetails that have products
            var colOrderDetails = from OrderDetails in this.OrderDetails
                                  where OrderDetails.Product != null
                                  select OrderDetails;
            foreach (var order in colOrderDetails)
            {
                dOrderTotal = dOrderTotal + (order.Quantity * order.Product.ProductPrice);
            }
            result = dOrderTotal;
        }
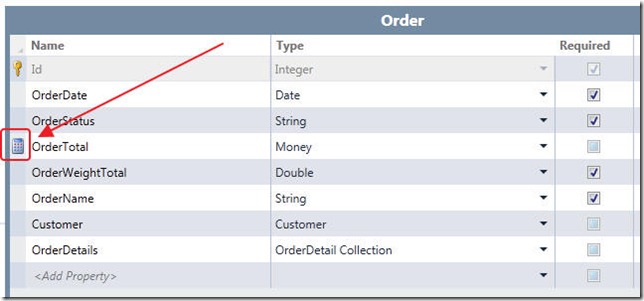
The calculator symbol will appear next to the OrderTotal field so you will know it is a computed field.
Make OrderWeightTotal and OrderName computed columns, and use the following code for their respective methods:
 partial void OrderWeightTotal_Compute(ref double result)
        {
            double dblWeightTotal = 0;
            // Get OrderDetails that have products
            var colOrderDetails = from OrderDetails in this.OrderDetails
                                  where OrderDetails.Product != null
                                  select OrderDetails;
            foreach (var order in colOrderDetails)
            {
                dblWeightTotal = dblWeightTotal + (order.Quantity * order.Product.ProductWeight);
            }
            result = dblWeightTotal;
        }
        partial void OrderName_Compute(ref string result)
        {
            if (this.Customer != null)
            {
                result = String.Format("{0} [{1} {2}]", this.Customer.CustomerName, this.OrderStatus, this.OrderDate.ToShortDateString());
            }
        }
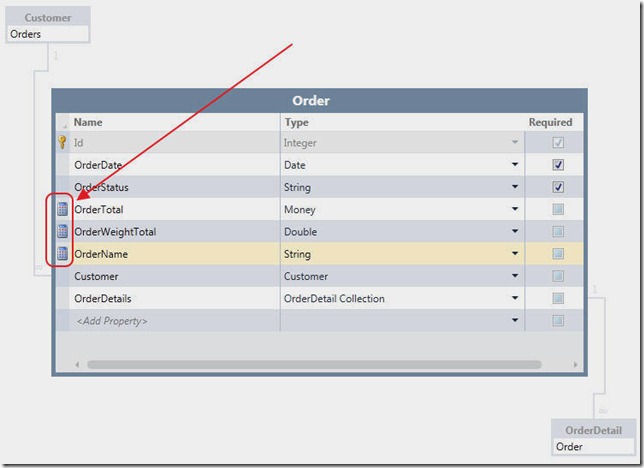
The Order table will resemble the image above.
While we could have created code on the LightSwitch Screens to do much the same thing (we will create screens in a later step), the Entity (the Table), is the proper place for this code for two main reasons:
- The fields will automatically appear on any screen or dropdown the Entity appears on
- We can write code against the computed value
Validation Code
The purpose of validation code is to prevent an Entity record from being saved or updated, when it does not meet certain rules. It is important to note that validation code only operates on one Entity at a time, however the "rule" can be based on data from multiple entities.
We can validate a single Field or an entire Entity. First we will look at validating a single Field (or Property).
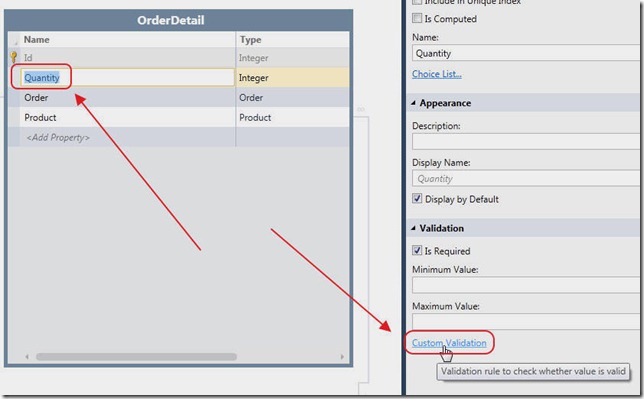
Open the OrderDetail Entity and click on the Quantity field. In the Properties, click Custom Validation.
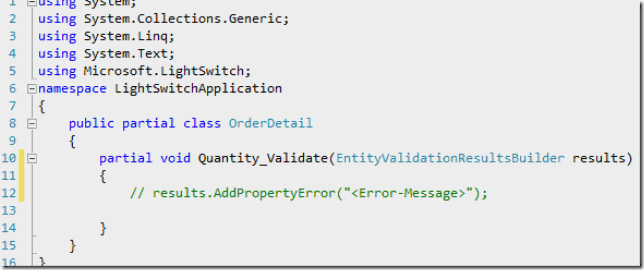
You will see a method that simply asks you to add a PropertyError to the results collection. The presence of a error will prevent the Entity from being saved and the error will show.
Change the method to the following:
        partial void Quantity_Validate(EntityValidationResultsBuilder results)
        {
            if (this.Quantity < 1)
            {
                results.AddPropertyError("Quantity must be greater than zero.");
            }
        }
"this." is the entity being saved. We simply check to see that Quantity is greater than 0.
Now, we will look at Entity validation:
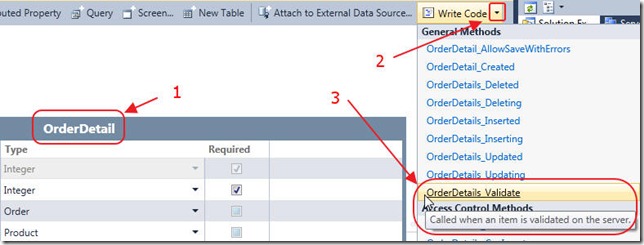
Open the OrderDetail Entity and select Write Code, then OrderDetails_Validate.
Use the following code for the method:
        partial void OrderDetails_Validate(OrderDetail entity, EntitySetValidationResultsBuilder results)
        {
            // Total for order cannot be over $100
            if (entity.Order.OrderTotal > 100)
            {
                results.AddEntityError(String.Format("Total order cannot be over $100.00"));
            }
            // Weight for order cannot be over 10 lbs
            if (entity.Order.OrderWeightTotal > 10)
            {
                results.AddEntityError(String.Format("Total Weight for order cannot be over 10 lbs"));
            }
        }
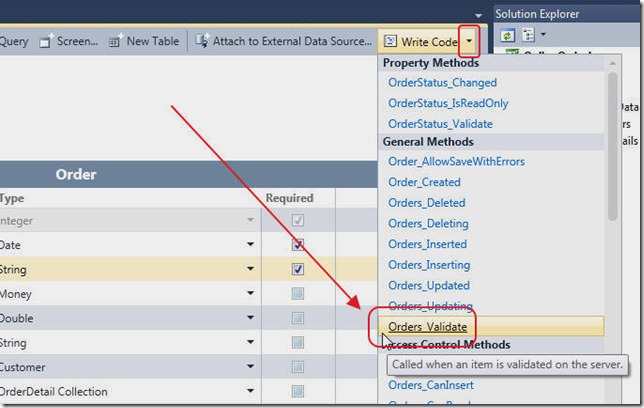
Select the Orders_Validate method on the Order Entity.
Change the method to the following:
        partial void Orders_Validate(Order entity, EntitySetValidationResultsBuilder results)
        {
            // Weight for order cannot be over 10 lbs
            if (
                (entity.OrderStatus != "New") &&
                (entity.OrderStatus != "Processing") &&
                (entity.OrderStatus != "Complete")
                )
            {
                results.AddEntityError(String.Format("The only valid Status is 'New', 'Processing', or 'Complete'"));
            }
        }
Note, LightSwitch will automatically create a dropdown for the OrderStatus field because it is using a choice list, however, you can still override this and change it to a text field. In that case you would need this validation.
PreProcess Queries
PreProcess Queries allow us to alter the query used to access data. The normal query is executed, but, any PreProcess method will add an additional constraint to the query. In this example, we will use it to:
- Allow a Company (a non administrator), to see, and only place orders, for themselves.
Essentially, we will only apply the PreProcess query if the user is not an Administrator. We will apply this query to the Entities that we will give a Company access to if they log into the application:
- Customers
- Orders
- Order Details
We will prevent a Customer/Company from accessing the Companies screen (that we will create in a later step). Also note, while we do not plan to allow a Customer to see the master Companies screen, we do need to set the security, so that any drop down that shows Customers, is constrained to only show a Customer's own record.
This is an example of learning to think "in the LightSwitch way". You want to implement business rules and security at the Entity level whenever possible. Any screen or drop down that you create later, will automatically follow the rules you create. This saves an incredible amount of time, and makes the final application far more stable and robust than simply creating code at the time a list or dropdown is displayed on a Screen.
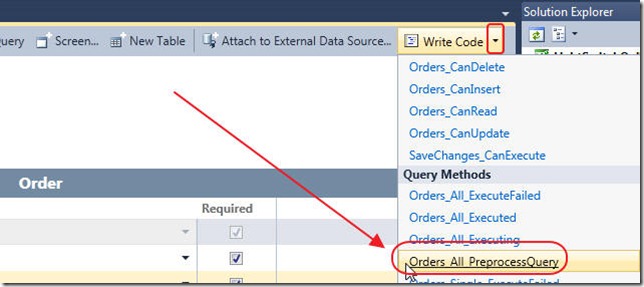
Open the Order Entity and select Orders_All_PreProcessQuery.
Change the method to the following:
      partial void Orders_All_PreprocessQuery(ref IQueryable<Order> query)
        {
            // This will run if the user is not an Administrator
            bool IsAdmin = this.Application.User.HasPermission(Permissions.SecurityAdministration);
            if (!IsAdmin)
            {
                // This will restrict this query to Orders that belong to the current Customer
                query = query.Where(x => x.Customer.UserName == this.Application.User.Name);
            }
        }
Perform the same steps for the OrderDetail Entity (OrderDetails_All_PreprocessQuery):
partial void OrderDetails_All_PreprocessQuery(ref IQueryable<OrderDetail> query)
        {
            // This will run if the user is not an Administrator
            bool IsAdmin = this.Application.User.HasPermission(Permissions.SecurityAdministration);
            if (!IsAdmin)
            {
                // This will restrict this query to Orders that belong to the current Customer
                query = query.Where(x => x.Order.Customer.UserName == this.Application.User.Name);
            }
        }
Perform the same steps for the Customer Entity (Customers_All_PreprocessQuery):
partial void Customers_All_PreprocessQuery(ref IQueryable<Customer> query)
        {
            // This will run if the user is not an Administrator
            bool IsAdmin = this.Application.User.HasPermission(Permissions.SecurityAdministration);
            if (!IsAdmin)
            {
                // This will restrict this query to the current Customer
                query = query.Where(x => x.UserName == this.Application.User.Name);
            }
        }
Creating Screens
Creating screens is very easy. In this example we will just use the default screens, but they are highly customizable and you can also consume your own Silverlight custom controls. For more on this, see the tutorials on my site at: http://LightSwitch.ADefWebserver.com.
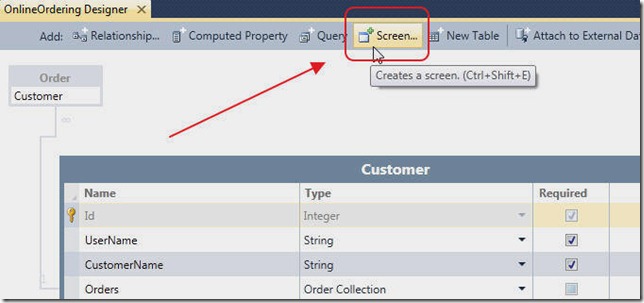
Open an Entity and select the Screen button.
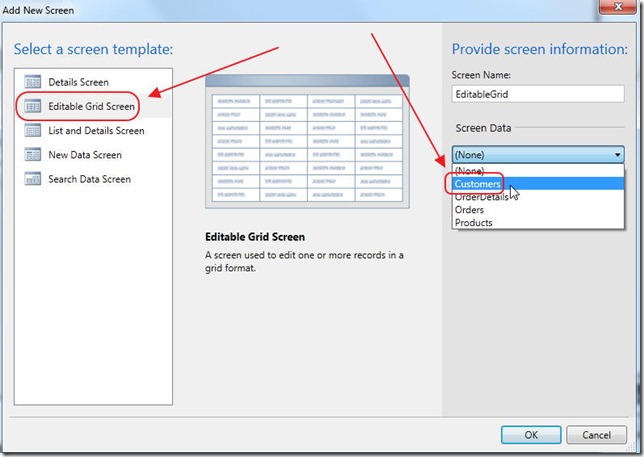
Select the Editable Grid Screen template and select Customers for Screen Data.
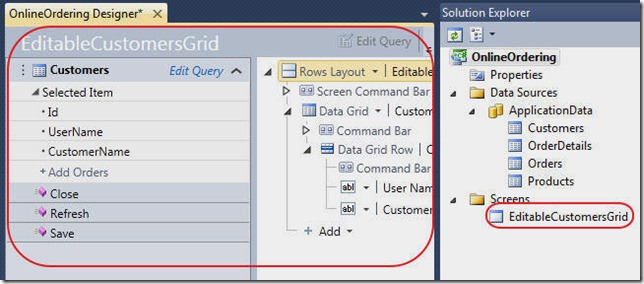
The screen designer will appear and the screen will show in the Screens folder. This is the place where you would normally customize a screen. We wont customize the screens in this tutorial, but, we will add a small piece of code to prevent the screen from being accessed by a non Administrator.
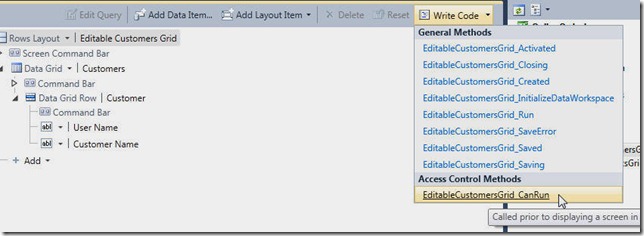
Select Write Code, then EditableCustomerGrid_CanRun.
Change the method to the following:
 partial void EditableCustomersGrid_CanRun(ref bool result)
        {
            // User must be an Administrator
            result = this.User.HasPermission(Permissions.SecurityAdministration);
        }
Preform the same steps to create a screen for the Product Entity.
Also, use the following code for the EditableProductsGrid_CanRun method of that screen:
        partial void EditableProductsGrid_CanRun(ref bool result)
        {
            // User must be an Administrator
            result = this.User.HasPermission(Permissions.SecurityAdministration);
        }
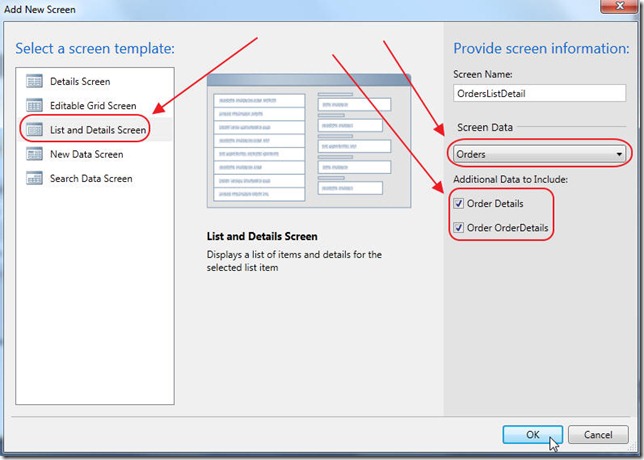
For the Orders Entity, select the List and Details Screen template, and select Orders for Screen Data, and Order Details and Order OrderDetails, for Additional Data to include.
Where is my code?
You may get a bit nervous putting code in various places. You may wonder how you can easily find custom code that has been created in a LightSwitch project. This is not a problem.
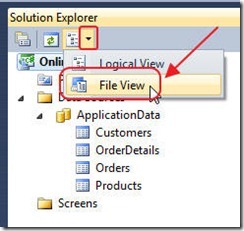
In the Solution Explorer, select File View.
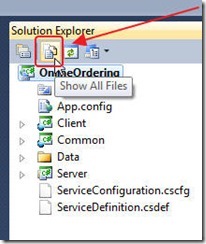
Select Show All Files.
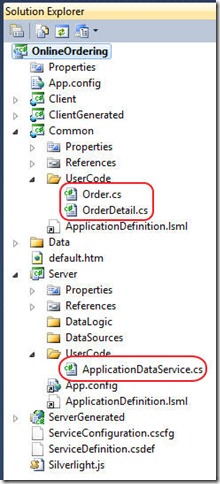
You will easily locate all the custom code we have written in the UserCode folders.
Run The Application
At this point we have completed creating the application. If you are a professional developer and a cold chill just went through your body you are not alone. Rest assured, a professional developer will still be needed to create LightSwitch programs like the one described at this link.
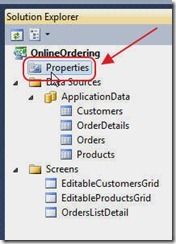
Before we run the application, let us look at the user we will be. Go into Properties...
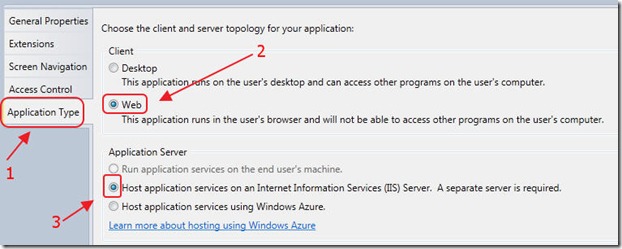
Select Web as the Application Type, and indicate that it will be hosted in IIS.
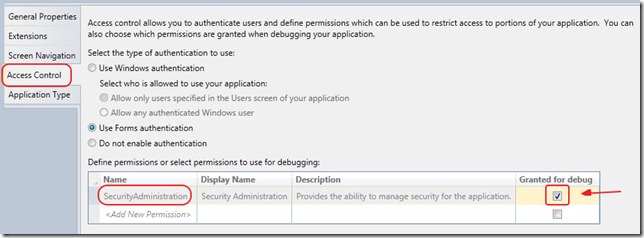
Select Access Control, and insure that Granted for Debug,, is checked for "SecurityAdministration". When we run the project in debug mode, we will be a user called "TestUser". That user will be an Administrator when we have that box checked.
Later, we can uncheck this box, and we will be able to see what a normal Customer would see when they run the application. However, that Customer will have to have an account in the user table as "TestUser" because that is who you always are when running a LightSwitch application in debug mode.

Hit F5 to build and run the application.
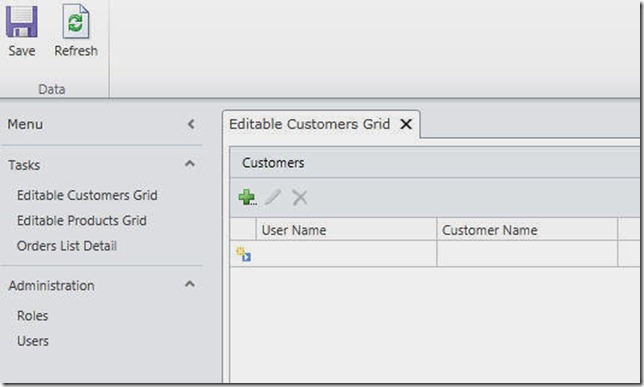
You will automatically be logged in as TestUser. When we deploy the application, a log in screen will show first.
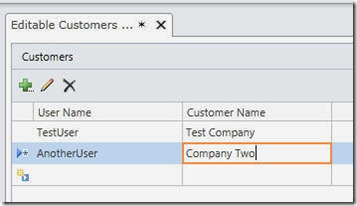
We enter two Customers. We make sure one of the users is "TestUser".
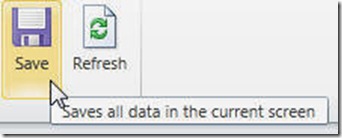
Make sure you hit the Save button to save your data.

Enter a few Products...
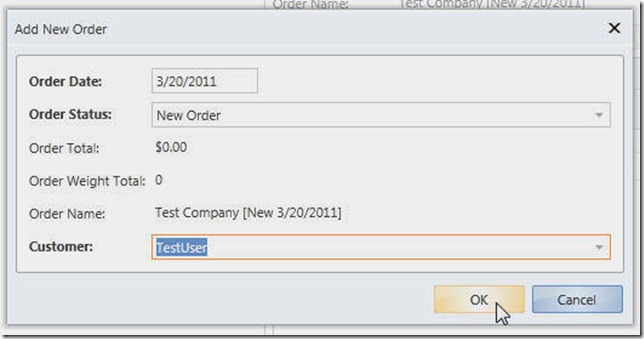
When we go to the Order List Detail screen, we can click the big green plus button to open the Add New Order popup.
(yes, you can control the design and layout of all these screens and popups (including preventing popups), but notice how much has been created for us with little effort on our part)
![img4E[1] img4E[1]](/portals/0/blog/7d10287b2ba7_702/img4E1_thumb.jpg)
We can add Order Details to the Order.

If we stop the program, and uncheck the Granted for Debug box, and the hit F5 again...
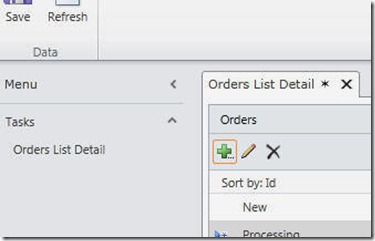
We see that the only screen we can access is the Orders List Detail screen, and we can only see and place orders for "TestUser".
Deploy The Application

Create a database in SQL server. Make sure you have a account that has database ownership.
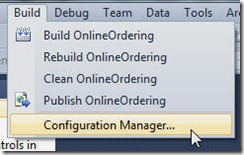
In Visual Studio, select Build, then Configuration Manager.
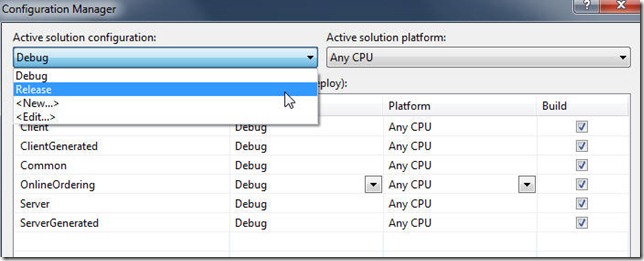
Change to Release mode. (if you don't do this you will see the "screen design" box in the deployed application)
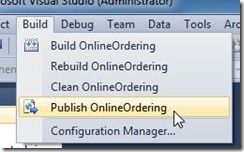
In Visual Studio, select Build then Publish OnlineOrdering..
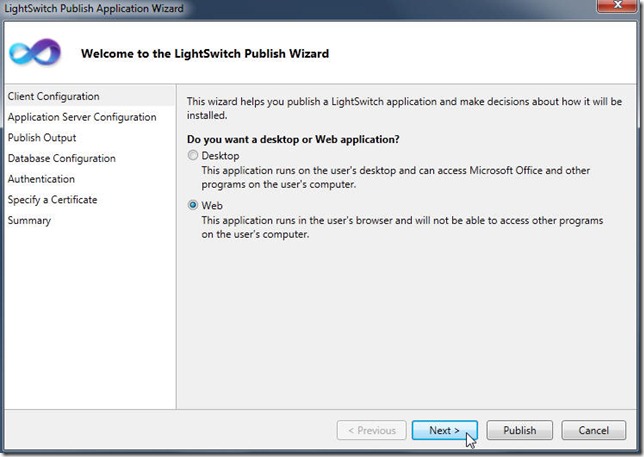
Select Web.
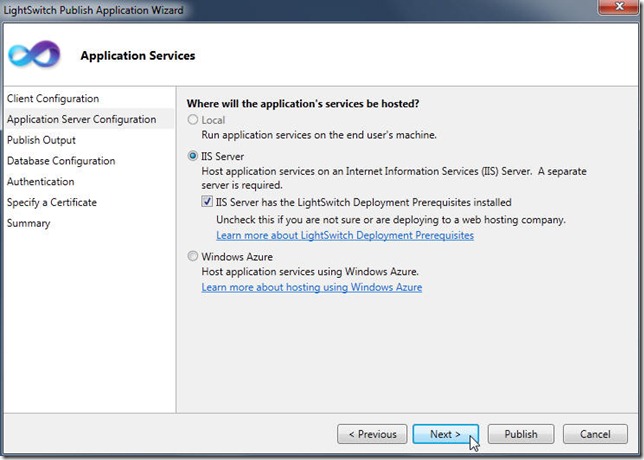
Select IIS.
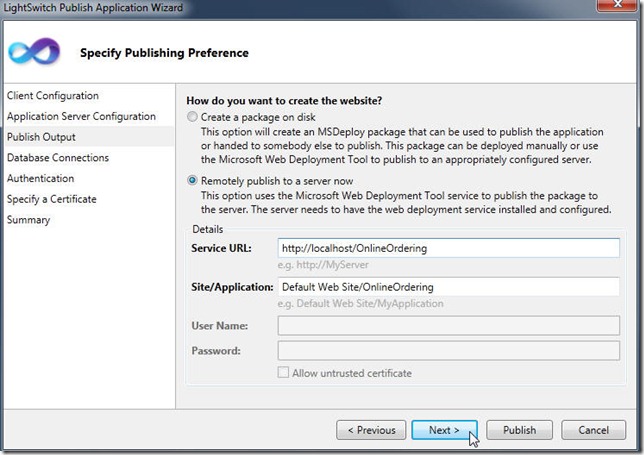
Enter the address you want to deploy the website to, (this server must have the LightSwitch Deployment Prerequisites installed. There is a link for them on the previous page of the wizard).
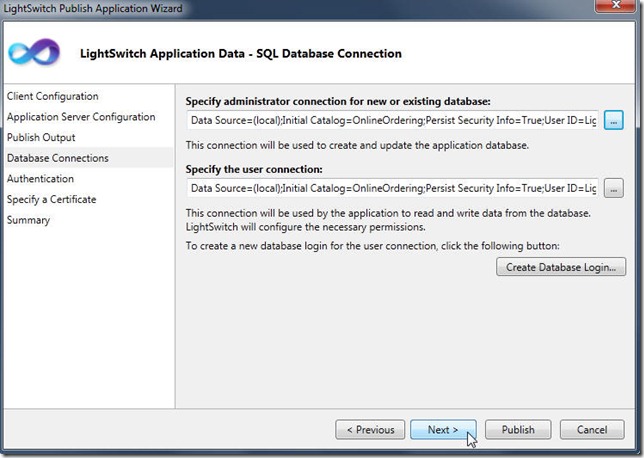
Enter the SQL server account you created earlier.
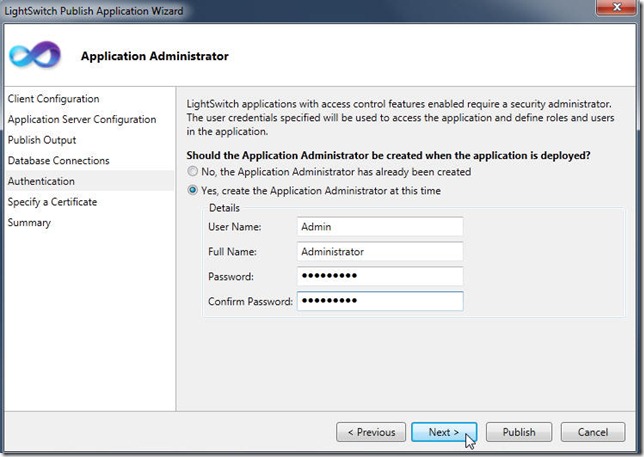
On this screen, you need to create a user for the application. The first time you run the application, this will be the only user. This is the user you will need to log in as, to create accounts for all the other users.
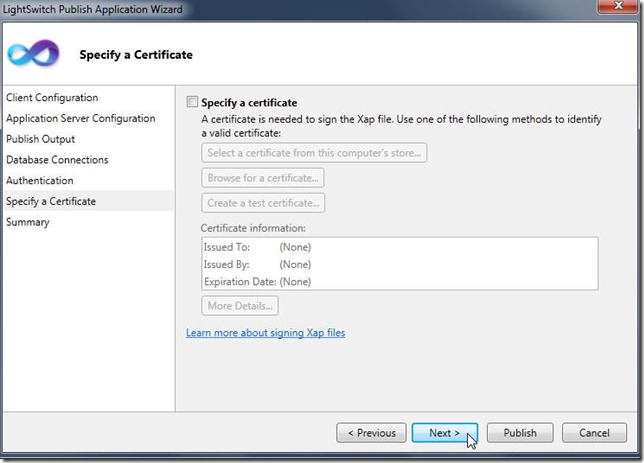
You can just click strong>Next on the Specify a Certificate page.
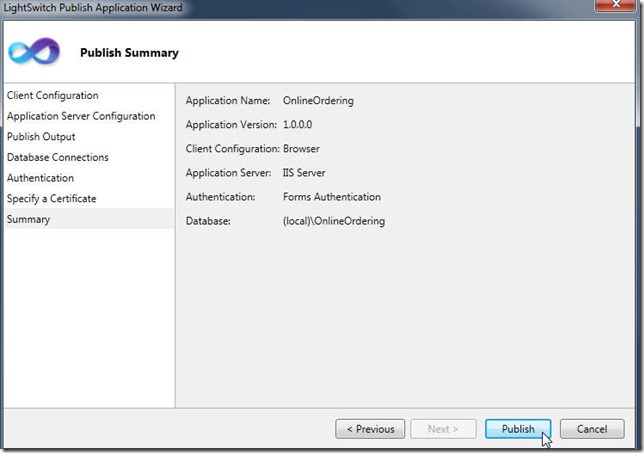
click Publish.
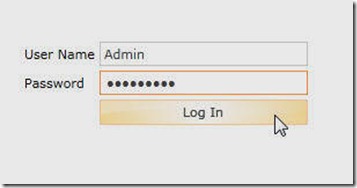
Navigate to the website in your web browser. Log in using the account you created in the wizard.
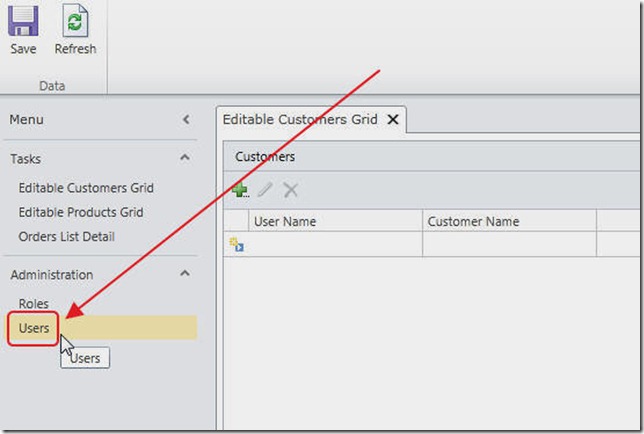
Because this user is an Administrator, it is able to see the Administration in the Menu. Click on Users.
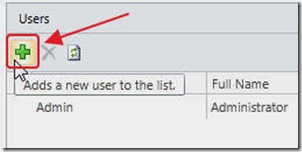
You will be able to create other users.
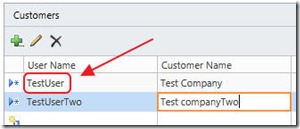
When you make entries in the Customers screen, make sure the User Name matches the User Name created on the Users screen.
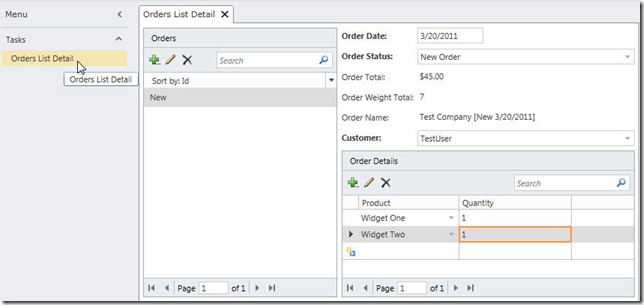
If you close your web browser, and log in as the user you created, you will see that the user is only able to place, and view their own orders.
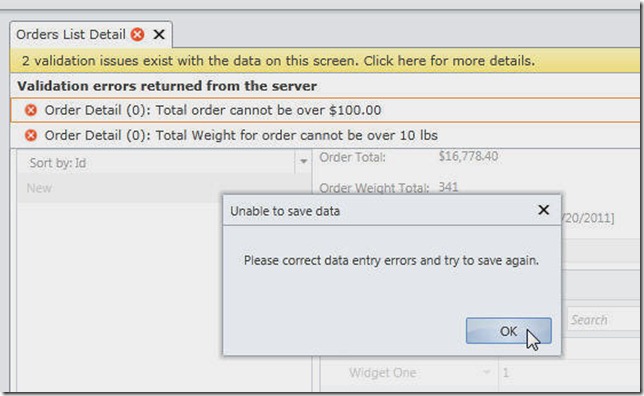
All the business validation will also work.
You Can't Put The Genie Back in The Bottle
If you are a professional developer, you have to accept the truth, things have changed permanently. The days of six figured budgets, to employ half a dozen developers, on a run of the mill LOB application, for weeks, may be over. While some projects will still need costly customized HTML front-ends, the majority of any application is "back office stuff", and that can be done in LightSwitch by a single developer in only days.
The good news is that LightSwitch will primarily be used to replace projects that are currently done manually in Excel. The market for forms-over-data applications just got a lot bigger. However, any project that can be done in LightSwitch, can be completed with a 75%+ savings in time and cost. The only way to compete, is to use LightSwitch wherever it is appropriate.
More Advanced Tutorials:
Also see an advanced LightSwitch application: Integrating Visual Studio LightSwitch Application Into An Existing Website using IFrames
LightSwitch Student information System
50 comment(s) so far...
i've loaded the sample but have 14 errors related to the ApplicationDefinition.lsml. they all are similar to:
Error 13
The format of a metadata file referenced by the project is incorrect.
The type 'DisplayMethodByDefault' was not found. Verify that you are not missing an assembly reference and that all referenced assemblies have been built.
how do you correc these?
tia
jim s
By jim s on
3/22/2011 6:50 AM
|
@Jim - Ensure that you have LightSwitch properly installed. Also consult the LightSwitch Forums:
http://social.msdn.microsoft.com/Forums/en-US/lightswitch/threads
By Michael Washington on
12/27/2011 11:12 AM
|
Very nice article. I unfortunately get a Configuration Error at Runtime.
Parser Error Message:
Could not load type 'Microsoft.LightSwitch.WebHost.Implementation.RedirectToHttpsModule' from assembly 'Microsoft.LightSwitch.Server.Internal,Version=10.0.0.0, Culture=neutral, PublicKeyToken=b03f5f7f11d50a3a'. (D:\Patrick.Documents\Visual Studio 2010\Projects\Learning\OnlineOrderingSystem\OnlineOrderingSystem\Bin\Debug\web.config line 30)
Also, maybe I missed it, but where do you first specify your SQL connection? Not until you Deploy?
Thanks for all of you work on this topic. You have become my number one source for info on Lightswitch.
By Patrick Schaller on
3/23/2011 7:10 AM
|
Ignore the first part of my last comment. The error was due to the Beta 1 Beta 2 bug. After uninstalling 1 and re-installing 2 I am good to go. Still curious about the SQL part though.
By Patrick Schaller on
3/23/2011 7:10 AM
|
@Patrick Schaller - You do not specify your SQL connection until you deploy. Before then LightSwitch uses a internal SQL Express database.
By Michael Washington on
3/23/2011 7:11 AM
|
Very nice example, thanks so much for your wonderful work.
Is it possible to give us a walkthrough how to use authentication with external database?
Thanks,
Rachida Dukes
By Rachida Dukes on
3/24/2011 7:17 PM
|
@Rachida Dukes - The closest thing I have planned is showing how to use LightSwitch connected to a DotNetNuke database. But, the LightSwitch tables will be in the DotNetNuke database using the DotNetNuke membership tables.
By Michael Washington on
3/24/2011 7:25 PM
|
Thanks so much for your fast response. I undestand from your response that you're still working on doing it using dotNetNuke database.
When are you planning to publish your article?
Thanks again for your work.
Rachida
By Rachida Dukes on
3/25/2011 3:44 PM
|
@Rachida Dukes - It might take a few weeks because there are a series of articles I plan to do.
By Michael Washington on
3/25/2011 3:45 PM
|
Very good!
But the biggest problem with the lightswitch, it's performance and memory consumption (client side).
Do you agree?
Thanks.
By raphael on
5/23/2011 8:05 PM
|
Michael -
It would seem that someone at MS missed the boat, at least given what appears to be the initial market target, by not providing for the use of SQL CE in LightSwitch. Would it be possible to develop using Express and deploy using CE on the web. This could open a wider array of web based small business apps and servers if no SQL service was needed for the backend database.
CuriousAboutCE
By CuriousAboutCE on
7/19/2011 7:54 PM
|
@CuriousAboutCE - LightSwitch requires a full SQL Server and as I understand it, SQL CE is not.
By Michael Washington on
7/19/2011 7:56 PM
|
The evaluation version does not have an option for configuration manager. Correct?
By harmono on
8/9/2011 4:48 PM
|
@harmono
Re: Configuration manager. Have you tried Tools > Options > Projects and Solutions > Select "Show advanced build configurations"?
By Simon on
8/30/2011 2:42 PM
|
I am very interested in your book, does it have a VB code samples cause i'm a VB programmer
By lockout on
9/5/2011 7:18 PM
|
@lockout - Sorry no VB in the book.
By Michael Washington on
9/5/2011 8:27 PM
|
Hello Michael,
I'm looking at buying your book and wanted to know if it has any information about creating custom forms as those from Visual Studio C#.
I don't own this and wanted to know if the Express version of Visual Studio Express 2010 will work with Lightswitch in this area?
Thanks in advance!
Ryckyc
By Ryckyc on
10/10/2011 1:01 PM
|
@Ryckyc - Sorry no on both counts.
By Michael Washington on
10/10/2011 5:21 PM
|
Thanks for this good walk-thru. I'm partially done but I did notice that the comment on the method just before you "Pre Processing Queries" section of the article, is incorrect. It shows as follows, but should be a comment about verification if the OrderStatus is set to a String type and doesn't use the drop down list we created. (Not about weight. Probably a copy/paste error from module code just above in walkthru.)
// Weight for order cannot be over 10 lbs
if (
(entity.OrderStatus != "New") &&
(entity.OrderStatus != "Processing") &&
(entity.OrderStatus != "Complete")
)
{
results.AddEntityError(String.Format("The only valid Status is 'New', 'Processing', or 'Complete'"));
By John on
1/17/2012 11:14 AM
|
Hello Crew,
Do you have any VB CODE ONLY C , PLEASE LET ME KNOW.
Thanks.
Nasser
By NASSER on
1/30/2012 6:53 AM
|
Hi Michael
In Order List Detail the Customer Drop down, it is not sorted by Customer name. It seems it is sorted by ID.
Is it possibel to sort it by Customer name?
Thanks
By Seangh on
2/8/2012 9:32 AM
|
@Seangh - On the Screen in LightSwitch, you can click on Customer (on the left-hand side) and set the sort.
By Michael Washington on
2/8/2012 10:12 AM
|
Quick query:
We've been having LightSwitch nightmares lately after deciding to use it for our latest Desktop App project.
While it got us to 80% completion in no time, it was terrible trying to figure out doing simple, custom actions and functionality in the app beyond that. We found that even simple references like System.Net seemed to be watered down i.e. only downloadStringAsync and uploadStringAsync methods, no othe ways to download content from the web to the app.
nearly impossible to start or control processes or execute shell commands, and AutomationFactory is useless in integrating the shell object.
Our biggest nightmare stil stands:
Our initial build, including prerequisites like SQL Express etc. comes to about 700MB, so deploying to web is impossible.
However we're now stumped as to how to do ClickOnce updates to the app beyond that first install.
(Not too smart to have to write/send cd's for every update)
Anybody else find the app deployment a bit lacking (desktop apps, not web)
By LSNIGHTMARE on
3/2/2012 11:34 AM
|
@LSNIGHTMARE - Please post to the forums so we can discuss your issues.
By Michael Washington on
3/2/2012 12:02 PM
|
Hi,Being new to both Lightswitch and C# I thought I would work my way through this example to try and learn about Lightswitch. So far so good! I've got down to pressing F5 for the first time and get the following error.'...
By kgns on
3/29/2012 7:44 AM
|
@kgns - Your error appears to be related to your LightSwitch installation not the code.
By Michael Washington on
3/29/2012 7:46 AM
|
Hi Michael W.
Thank you for these good work. Indeed it is great and helpful. Please I need your help on a project i am handling now. It is about library management. I've developed it up to the final stage. The only problem is that when a book is lent to users, my application failed to utionpdate the book status. the BookStatus field is a choice type (in-circulation, out-of-circulation, borrowed).
The following is the structure of the entities.
BookTitle - keeps the title of books, ISBN, image of front cover, publisher etc.
Authors - Keep the authors of the books. (The relationship is one booktitle to many authors)
BookCopies - (accession_number, bookstatus, edition,DateAcquired, LocationOnShelf) relationship is one book to many bookcopies.
LibraryUsers - keeps user's details
BookLease - (keeps the detail of books borrowed by users, who borrowed them, when returned etc.) it is related to 3 tables (booktitle, bookcopies and Libraryusers)
By Fred on
6/5/2012 8:03 AM
|
@Fred - Perhaps this article can help: http://lightswitchhelpwebsite.com/Blog/tabid/61/EntryId/14/LightSwitch-Procedural-Operations-ldquo-Do-This-Then-Do-That-rdquo.aspx or this one: http://lightswitchhelpwebsite.com/Blog/tabid/61/tagid/5/Student-Information-System.aspx
By Michael Washington on
6/5/2012 8:32 AM
|
Hi Michael,
I think I discovered an error in the line:
query = query.Where(x => x.UserName == this.Application.User.Name);
should it be:
query = query.Where(x => x.Customer.UserName == this.Application.User.Name);
as I was getting an error with just x.UserName as UserName was not art of the OrderDetails.
Thanks,
Keith
By CyclingFoodmanPA on
6/26/2012 7:18 AM
|
@CyclingFoodmanPA - When you download the sample code do you get an error?
By Michael Washington on
6/26/2012 7:19 AM
|
I didn't download the sample code, I was just working through the tutorial. Where is the link to download the sample? I find when learning something new, I do better to go through the tutorial. Then when I am comfortable with something, I download the sample and run it and check things out as then I am working on understanding the particular idiosyncracies of the product.
By CyclingFoodmanPA on
6/27/2012 5:07 AM
|
Hi Michael, great article! Where is the sample code download? I also can't find it.
By Eric Higgins on
7/16/2012 2:21 PM
|
@Eric Higgins - You can download it here:
http://www.codeproject.com/Articles/171002/LightSwitch-Online-Ordering-System
By Michael Washington on
7/16/2012 2:23 PM
|
Hi,Thanks for the nice project. I am following your tutor and learning a lot. I am using Visual Studio 2012 RC and LightSwitch but unable to run your downloaded "Online Ordering System". When I load it into LifgtSwitch, it tells me that LW is a later version than the one used for your download. I hope this isn't true that there is no backward compatability. I was wondering if you have tried it in the 2012 VS/LightSwitch version? If you have and created a slightly new compatable version, would it be available for downloading. Thanks. I would like to see the running version as I am not sure what a few areas of code are doing. Thank you
By Edward Piccoli on
8/6/2012 2:43 PM
|
@Edward Piccoli - The released version of LightSwitch will come out in August 2012. It should upgrade when opened by that version.
By Michael Washington on
8/6/2012 2:44 PM
|
Awesome job. I did you're sample in less than an hour. My only concern with this product is scalability. Initially it would be for a small group but once business users start seeing applications like this they'll want to use and hence we're back to custom small solutions being use for enterprise purposes.
How hard would it be to scale a solution built in LightSwitch?
Regards,
By Joe Contreras on
8/11/2012 5:42 AM
|
@Joe Contreras - in my experience LightSwitch scales just fine. You can do a Google search in the Microsoft LightSwitch forums to find posts on actual numbers.
By Michael Washington on
8/11/2012 5:43 AM
|
Hi Michael, great article
By Mohsen on
8/31/2012 5:30 AM
|
After deploying following all steps mentioned in the OnlineOrdering example, I entered "http://localhost/OnlineOrdering" in my browser address bar, I received runtime error as follows that I could not fixed:
Server Error in '/OnlineOrdering' Application.
--------------------------------------------------------------------------------
Runtime Error
Description: An application error occurred on the server. The current custom error settings for this application prevent the details of the application error from being viewed.
Details: To enable the details of this specific error message to be viewable on the local server machine, please create a tag within a "web.config" configuration file located in the root directory of the current web application. This tag should then have its "mode" attribute set to "RemoteOnly". To enable the details to be viewable on remote machines, please set "mode" to "Off".
Notes: The current error page you are seeing can be replaced by a custom error page by modifying the "defaultRedirect" attribute of the application's configuration tag to point to a custom error page URL.
PLEASE HELP HOW TO RESOLVE THIS ERROR.
By AbdulSalam on
9/22/2012 7:37 AM
|
@AbdulSalam - That is a deployment issue not a problem with the code. Please google lightswitch deployment and publishing for assistance.
By Michael Washington on
9/22/2012 10:07 AM
|
Hi Michael,
Thanks for taking the time to write this. I was wondering about the Orders_All_PreprocessQuery method (or any PreprocessQuery method). I don't have that option in Visual Studio 2012. Is this a VS 2010 option only?
By CM Smith on
10/6/2012 5:07 AM
|
Just replying to my own question. Looks like they changed the PreprocessQuery method with the Filter method. Works pretty much the same though:
partial void Orders_Filter(ref Expression> filter)
{
bool isAdmin = this.Application.User.HasPermission(Permissions.SecurityAdministration);
if (!isAdmin)
{
filter = e => e.Customer.UserName == this.Application.User.Name;
}
}
Here's the link for it: http://blogs.msdn.com/b/lightswitch/archive/2012/04/17/filtering-data-using-entity-set-filters-michael-simons.aspx
By CM Smith on
10/6/2012 5:07 AM
|
Hi Michael
Love this article, but im a newby coder and wonder if you can help me with this section , i m a vb.net coder and not quite sure what its doing.
Could someone help me out to explain this a bit, is it making a collection of the rows in orderdetails and saying the total = quantity x price ?
I just dont get how you can code all that in 3 lines !
decimal dOrderTotal = 0.0M;
// Get OrderDetails that have products
var colOrderDetails = from OrderDetails in this.OrderDetails
where OrderDetails.Product != null
select OrderDetails;
foreach (var order in colOrderDetails)
{
dOrderTotal = dOrderTotal + (order.Quantity * order.Product.ProductPrice);
}
result = dOrderTotal;
By webhippy on
10/22/2012 11:15 AM
|
@webhippy - Yes, that is what it is doing.
By Michael Washington on
10/22/2012 11:18 AM
|
Hello Michel,
Thanks for this example,
can you send me this example in VB coding ?
Thanks
Hai
By Hai Jelasko on
10/31/2012 10:24 AM
|
@Hai Jelasko - I am sorry but that will not be possible.
By Michael Washington on
10/31/2012 10:25 AM
|
Hi Michael
This is an excellent example of using Silverlight control with lightswitch. However I did able to achieve this in my app using Silverlight custom control in lightswitch. I have enabled sharepoint it interacts with sharepoint fine for debugging but I could not publish app as a sharepoint app. How could I publish as sharepoint app ?
By Paras on
4/23/2013 5:25 AM
|
@Paras - I have not had a chance to do any SharePoint articles. However, when I do they will be with the HTML Client, sorry.
By Michael Washington on
4/23/2013 5:28 AM
|
Hi Michal,
I have gone though with your sample it was amazing, but I am trying to explore various custom controls like dropdownlist, radio button, checkbox list in my application and how can we bind these controls with database. Kindly do share some useful sample application using visual studio lightswitch HTML client where we can populate the data and bind control with the database.
Thanks
Anshul Srivastava
By Anshul Srivastava on
6/21/2013 1:52 AM
|
@Anshul Srivastava - See the "LightSwitch HTML Client (Data)" section on the front page of this site.
By Michael Washington on
6/21/2013 4:14 AM
|